- Which regions are participating in the pilot project?
- Creation and loading;
- Filling out the document;
- Checking and sending;
- Processing statuses;
- View scan results;
- How to print or delete a document? How to create a recalculation? How to view document flow history?
In the pilot regions, benefits are paid to employees not by the employer, but directly by the Social Insurance Fund (see Decrees of the Government of the Russian Federation dated April 21, 2011 No. 294 and dated December 1, 2018 No. 1459). The employer is only required to submit the relevant documents to the fund’s branch. The procedure for sending documents to the FSS is described in the video.
A pilot project for sending sick leave to the Social Insurance Fund is taking place in the following regions:
- 01 - Republic of Adygea;
- 03 - Republic of Buryatia;
- 04 - Altai Republic;
- 06 - Republic of Ingushetia;
- 07 - Kabardino-Balkarian Republic;
- 08 - Republic of Kalmykia;
- 09 - Karachay-Cherkess Republic;
- 10 - Republic of Karelia;
- 11 - Komi Republic;
- 12 - Republic of Mari El;
- 13 - Republic of Mordovia;
- 14 - Republic of Sakha (Yakutia);
- 15 - Republic of North Ossetia - Alania;
- 16 - Republic of Tatarstan;
- 17 - Republic of Tyva;
- 18 - Udmurt Republic;
- 19 - Republic of Khakassia;
- 20 - Chechen Republic;
- 21 - Chuvash Republic;
- 22 - Altai region;
- 25 - Primorsky Krai;
- 27 - Khabarovsk Territory;
- 28 - Amur region;
- 29 - Arkhangelsk region;
- 30 - Astrakhan region;
- 31 - Belgorod region;
- 32 - Bryansk region;
- 33 - Vladimir region;
- 35 - Vologda region;
- 36 - Voronezh region;
- 37 - Ivanovo region;
- 38 - Irkutsk region;
- 39 - Kaliningrad region;
- 40 - Kaluga region;
- 41 - Kamchatka region;
- 42 - Kemerovo region;
- 43 - Kirov region;
- 44 - Kostroma region;
- 45 - Kurgan region;
- 46 - Kursk region;
- 48 — Lipetsk region
- 49 - Magadan region;
- 51 - Murmansk region;
- 52 - Nizhny Novgorod region;
- 53 - Novgorod region;
- 54 - Novosibirsk region;
- 55 - Omsk region;
- 56 - Orenburg region;
- 57 - Oryol region;
- 58 - Penza region;
- 60 - Pskov region;
- 61 - Rostov region;
- 62 - Ryazan region;
- 63 - Samara region;
- 64 - Saratov region;
- 65 - Sakhalin region;
- 67 - Samara region;
- 68 - Tambov region;
- 69 - Tver region;
- 70 - Tomsk region;
- 71 - Tula region;
- 73 - Ulyanovsk region;
- 75 - Transbaikal region;
- 79 - Jewish Autonomous Region;
- 83 - Nenets Autonomous Okrug;
- 80 - Transbaikal region;
- 87 - Chukotka Autonomous Okrug;
- 89 - Yamalo-Nenets Autonomous Okrug;
- 91 - Crimea;
- 92 - Sevastopol;
- 95 - Chechen Republic.
Registers of sick leave (disability certificates) are transferred by policyholders or insured persons to the Social Insurance Fund for the calculation of disability benefits to insured persons.
The following types of benefits are available in Kontur.Extern:
Insured events and conditions for payment of benefits are established by Federal Law No. 255-FZ dated December 29, 2006.
| Insurance case | Conditions for payment of benefits |
| Temporary disability | Paid in the following cases: - illness, injury; - caring for a sick family member; — quarantine of the insured person or child under 7 years of age; — after-care in sanatorium-resort institutions |
| Occupational diseases and injuries | Paid in case of loss of ability to work due to an accident at work or occupational disease (detailed conditions are described in Federal Law No. 125-FZ of July 24, 1998) |
| Pregnancy and childbirth | It is paid to the woman in total for the entire period of leave (in the absence of complications and the birth of one child, the period is 70 days before and after childbirth). Features of benefit payment are described in Chapter. 3, art. 10 255-ФЗ |
| Early pregnancy | Paid as a lump sum to women who registered with medical institutions in the early stages of pregnancy |
| birth of a child | One-time benefit for the birth of a child |
| Baby care | Monthly child care allowance until the child reaches the age of one and a half years |
| Burial | Social benefits for funerals are paid in accordance with Federal Law No. 8 of January 12, 1996 |
| Payment of 4 additional days off for one of the parents to care for disabled children | Four additional paid days off per month are provided to one of the working parents (guardian, trustee) to care for disabled children and people with disabilities from childhood to 18 years (Article 262 of the Labor Code of the Russian Federation) |
The procedure for generating and sending benefits
To start working with FSS benefits, on the main page of the system, select the desired organization at the top of the page and go to the “FSS” section > in the “Benefits and ELN” section, click on the “All documents” button.
If the item “FSS benefits and certificates of incapacity for work” is missing, make sure that the organization of one of the regions participating in the pilot project is indicated at the top of the page.
How the service works
Many people think that the work scheme of the Social Insurance Fund, the clinic, the employee and the employer is complicated. But the system was adopted in September 2021, and they began to use it only in December. Not all employers have connected to the FSS personal account system and not all clinics provide electronic sick leave. In the near future, all clinics will switch to a new convenient system of work.
You can receive an electronic sick leave certificate in your FSS personal account in the following way:
- You need to go to the clinic for medical help, where you will receive an electronic sick leave.
- The employee must sign the document with an electronic signature indicating the period of sick leave, as well as the reason for the disability and other nuances.
- You will be given a sick leave number to use in your FSS personal account. At your job you have to go to the accountant with this number.
- The specialist must find the electronic sick leave data in the FSS policyholder’s office. A legal entity or individual entrepreneur can register in this section.
Creating documents in Kontur.Extern
You must click on the “Create a new document” button.
In the window that opens, select the type of benefit, mark the desired employee in the list and click “Create document”.
The list of employees in the “FSS Benefits” service is common with the service for preparing reports to the pension fund Kontur-Otchet PF.
If the required employee is not in the list, then click the “Add new employee” button.
In the window that appears, fill in your full name and SNILS and click “Add employee.” The added employee will appear in the list and will be selected by default, and will also appear in the PF Contour-Report service.
Next, you should start filling out the form in the window that opens.
List of ELN
To go to the list of documents, open the main page of Kontur.Extern, then click the “ FSS” and then the “ FSS Benefits” . A list of benefits for the current month will be displayed.
To select a different period, you must click on the “ All documents” :
Search documents
To find the desired document, there is a Search . You can enter your full name and SNILS into the search bar.
If you want to find benefits from a previous period, you must click “ Continue search for....” :
Uploading a finished file into the system
Click the “Load from file” button.
In the window that opens, select a file and click “Open”. The file accepted into the system must be generated in the format established by the FSS and have an xml extension.
The uploaded documents will appear in the list. To check a document and send it to the FSS, click on the line with the required document. A form for editing and submitting will open.
Printing a list of documents with statuses
In some cases, it becomes necessary to print out a list of electronic information, for example, for reconciliations. To do this you need:
- In the list of benefits, select "Print list of documents":
- Specify period and format: PDF or XLS. The XLS format makes it possible to filter and sort a list of documents in printed form.
- Select Print . The file will be downloaded in the selected format.
- Print the downloaded file.
Filling out the document
There are three sections that must be completed in the benefit payment document. Depending on the selected type of manual, the following sections will be displayed:
- "General information".
- "Certificate of incapacity for work" . The section is displayed in disability benefits, maternity benefits, occupational injury benefits, and illness benefits.
- "Calculation of benefits."
- "Additional documents". The section is displayed in the maternity benefit (if the “Registered in the early stages of pregnancy (up to 12 weeks)” checkbox is checked in the disability benefit), early pregnancy benefit, childbirth benefit and child care benefit.
All required fields will be highlighted in red.
Get an answer
If the FSS does not detect errors and sends a positive response, the status will appear in the document:
- “ Sick leave
” - if only the calculation was sent according to the electronic tax record; - “ Report submitted
” - if a register of information was sent.
- How to adjust the calculation?
Section "General information"
In this section, information about the employee, the employing organization and the method of payment of benefits is filled out. The completed data is saved within the employee; when creating a new sheet, this section will be filled in automatically.
1. «Applicant” - it should be noted who is the recipient of the benefit:
- “Benefit recipient” - the benefit is received by the applicant himself.
- “Authorized representative” - the benefit is received by the applicant’s representative.
When you select the latter, a block opens in which you should enter information about the authorized representative - full name and passport details.
2. “Information about the benefit recipient” - you must fill in the details of the benefit recipient, such as full name, SNILS, date of birth, address, gender, registration status and identification document.
Information about employees is available simultaneously both in the “FSS Benefits” service and in the PF Contour-Report. If you change information about an employee in one service, it will change or be deleted in the other.
3. “Information about the employer (organization)” This section is filled in automatically from the payer’s details. All lines except the TIN can be changed manually. If you change the details of the employing organization here, they will also change in the details.
4. “Benefit payment method” - you must choose one of two payment methods:
- Transfer through a bank;
- To the “WORLD” card;
- Postal transfer;
- Through another organization.
5. The “General Information” section is completed, you need to move on to the next section. The “Save changes to the document?” window will appear, click the “Save” button and proceed to filling out the next section.
What errors may occur when working with ELN
While loading
Access to ELN with number XXX...., SNILS YYY..., status: ZZZ - limited
The error looks like this:
The bottom line is that sick leave cannot be changed by the policyholder. The status is highlighted in the image - it can take different values:
- Error code 010/020 . Sick leave has been opened/extended by the medical institution and is in the process of being processed. You need to return to downloading the document later, when it is closed.
- Error code 040 . The sick leave is under consideration by the ITU. You should return to downloading later.
- Error code 060. Sick leave was sent with one registration number, and the download was sent with another. You need to check the RNS and make sure that it matches the one that was indicated when filling out the ELN. If the number does not match, you should ask your FSS department to change the status of the electronic sick leave to 030 “ Closed” . And after that, load it with the new RNS. Or request an ELE with the RNS that was specified when filling out.
- Error code 090 . The sick leave was canceled by the medical institution for one of the reasons: it was issued on a paper bank or an error. You should ask the employee for a new sick leave number or take his paper form.
Number XXX... belongs to LN on paper form
The error looks like this:
This means that after the ELN was issued, the medical institution issued the employee a paper certificate of incapacity for work at his request. This form must be requested from the employee.
ELN with number: XXX...., SNILS YYY... - not in the database
The error text will be like this:
The error means that the sick leave was not found in the FSS database. This may be due to incorrectly specified FSS registration number, SNILS of the employee or E-Number. You need to check these parameters and fix the error.
Incorrect parameters: Per
Error text:
The error means that the request to download the document was signed by a representative who does not have a power of attorney.
You need to contact the Foundation branch and clarify what’s going on with the power of attorney.
Section “Certificate of incapacity for work”
The section is present in the following types of benefits:
- disability benefits;
- maternity benefits;
- benefits for occupational injury, illness.
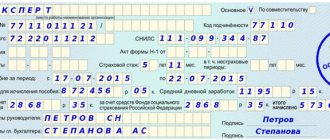
Filled out based on the certificate of incapacity for work submitted by the employee. The layout of the fields corresponds to the paper form that is issued at the medical institution.
1. “Incapacity sheet No.” - the number of the incapacity sheet should be indicated in the cell: a 12-digit code under the barcode in the upper right corner of the incapacity sheet form.
2. Indicate whether the sheet is primary or continuation; duplicate or original.
- If the disability sheet being generated is not a continuation of another sheet, check the “Primary” box.
- If a certificate of incapacity for work is issued to replace a lost one, Fr.
- If the sheet is a continuation of another sheet, the number of the primary sheet should be indicated in the “Continuation of disability sheet No.” field. There is no need to check the “Primary” box.
3. Fill out all the required fields below (they will be highlighted in red), just like on a paper form issued by a medical facility.
Some filling features:
- Depending on which reason for disability code is selected, the required fields will be highlighted in red frames below.
- The code book does not contain the values 04 (work accident or its consequences) and 07 (occupational disease or its exacerbation). A document containing these reasons for disability cannot be sent electronically. These data should be submitted to the Social Insurance Fund on paper.
- If you have chosen a part-time job, then in the “No.” field you should indicate the number of the certificate of incapacity for work presented at the main place of work.
- If another sheet was issued, which is a continuation of the one being filled out, then its number should be indicated at the very bottom of the section.
4. The “Sheet of Incapacity for Work” section is completed, click the “Save” button and move on to the next one.
Results
The sick leave register has been officially approved only for insurers registered in the regions where the Social Insurance Fund pilot project is being conducted. For “non-pilots” the document does not have an officially established template. It includes all information on employees and sick leave that is necessary for an accountant or Social Insurance Fund employees.
Sources: order of the Federal Tax Service of the Russian Federation dated November 24, 2017 No. 579
You can find more complete information on the topic in ConsultantPlus. Free trial access to the system for 2 days.
Section "Calculation of benefits"
In this section, fill in the data necessary to assign benefits to an employee by the regional branch of the Social Insurance Fund. All required fields will be highlighted in red.
1. “Information attribute” - you should select the “Primary information” item if the benefit is sent to the Social Insurance Fund for the first time. The “Recalculation” item is selected if the benefit has been sent and adjustments need to be made.
2. “Date of submission of documents to the policyholder” - the date when the benefit recipient submitted the application and additional documents to the employer should be indicated.
3. Indicate the regional coefficient, rate, insurance period, year and amount of earnings.
If you need to specify information about replacing billing years, you should check the “Fill in information about replacing years” checkbox. Additional fields will appear to indicate the years to be replaced.
4. “Benefit payment period” - you should select whether the benefit is paid entirely at the expense of the employer or whether there is a period for which the benefit is paid at the expense of the Social Insurance Fund. In the second case, in the field “Benefit at the expense of the Social Insurance Fund for the period”, be sure to indicate the beginning and end of the period for which the benefit is accrued at the expense of the Social Insurance Fund.
5. The “Benefit Calculation” section is completed; click the “Check and Submit” button.
Section "Additional Documents"
The section is present in the following types of benefits:
- maternity benefit (if the disability benefit checkbox “Registered in the early stages of pregnancy (up to 12 weeks)”);
- early pregnancy benefits;
- childbirth benefit;
- child care allowance.
Some filling features:
- It is mandatory to fill in the data from the child’s birth document - type of document, series and number, date of issue, full name, date of birth.
- If necessary, you can fill in information about a certificate from the other parent about non-receipt of benefits, information about an adoption or guardianship document, and information about an agreement on transfer to a foster family.
After filling out the section, click the “Save” button.
Checking and sending
1. To send, you must first open the document, then click the “Check and Send” button.
If you need to send several documents at the same time, you should open the “Details and Settings” menu and click the “Enable bulk sending mode” button.
After this, you will be able to send several documents.
2. The scan will begin.
- If the verification is successful, you should select a certificate to sign the document and click “Send document to the FSS.”
The list will display only qualified certificates whose TIN matches the organization’s TIN from the document.
The registration number of the policyholder in the certificate must match the registration number of the organization indicated in the document.
If the document is sent for a separate unit (in this case, the subordination code ends with 2), then the registration number of the policyholder in the certificate must match the additional FSS code specified in the document.
After sending, the document will appear first in the list with the status “Queue for sending”.
- If errors are found during the check, you should click the “Close and proceed to correct errors” button. Fields with errors will be highlighted in red; you should correct them and resend.
Responsibility for the absence of a register
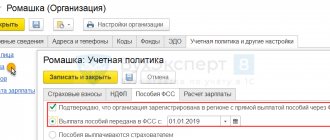
Participants in the pilot project will not be able to refuse to maintain the register, otherwise their employees will not be paid. This is fraught with complaints and inspections.
If in 2021 the region in which the organization operates is not covered by the Direct Payments project, it calculates and issues all benefits to employees independently. In the future, the employer has the opportunity to receive compensation for the transferred amounts. To do this, submit almost the same information, but also indicating the amount of benefits for compensation. Separately, for such a situation, a sample register of benefits for compensation in the Social Insurance Fund is not established by law, but K+ has a good form.
If convenient, use this template. It is not difficult to fill out if all the data is taken from official documents. Otherwise, the FSS will refuse compensation.
Processing statuses
- “Created” - the document was created, but not sent to the FSS. The date and time the document was last modified is indicated.
- “Queued for sending” - the document is queued for sending to the Social Insurance Fund.
- “Submit Error”—errors occurred during the document sending process. You need to send the document to the FSS again. To do this, click on the line with the document and click “Send again”.
- “Not accepted by the FSS” - as a result of checking the document in the FSS, errors were identified. You should correct the errors indicated in the FSS protocol and resend the document.
- “Accepted by the FSS” - the document is sent for consideration to the regional office of the FSS. The receipt can be viewed and printed.
If errors are found during the check at the regional office of the FSS, the notification should be received by Russian Post. In this case, you should make the required changes to the document and send it to the FSS.
How to transfer data to the FSS
With electronic document flow between the organization and the Social Insurance Fund, the accountant receives an electronic certificate of incapacity for work of the employee, fills out the employer’s part and sends the information to the fund within 5 calendar days. Instructions on how to send the register of sick leave to the Social Insurance Fund via TKS:
- The accountant creates a list online in one of the user programs - 1C, SBIS, "Kontur".
- The document is signed with an electronic signature and submitted to the social insurance department.
- The Foundation verifies the register.
- The policyholder receives notification of the result of the inspection.
- If filled out correctly, the money will be transferred to the employee within 10 days.
View scan results
If the document is accepted for consideration
If the document was submitted for consideration to the regional office of the FSS, the status “Accepted by the FSS” will be displayed. This is the final status.
To view a receipt, you need to click on the line with the document and follow the “View receipt” link.
A window with a receipt will appear on the screen.
The document for which the receipt was received can be edited and sent again to the FSS. To do this, click on the line with the document and click the “Correct errors and resend” or “Create recalculation” button. These functions will also be available if you hover your mouse over the line with the document and click on .
- “Correct errors and send again” - this item should be used if the document passed checks at the FSS gateway and was submitted for consideration to the regional office of the FSS, but during its review, shortcomings were discovered and the FSS sent a notice of errors to the employer (for example, by Russian Post "). You should correct the errors indicated in the notice and resend the document.
- “Create recalculation” - this item should be used if the document passed checks at the FSS gateway and was submitted for review to the regional FSS office, but after receiving the receipt the employer realized that an error was made in the calculation data. When creating a recalculation in the “Benefit Calculation” section, you will need to indicate the reason for the recalculation, correct the necessary data and resend the document.
If the document is not accepted
If the document was not accepted by the FSS, the status “Not accepted by the FSS” will be displayed. To view the log, you need to click on the line with the document and follow the “View error log” link.
A window with the protocol will appear on the screen.
The document for which the protocol was received must be corrected and sent again to the FSS. To do this, click on the line with the document and click the “Correct errors and resend” button. This function will also be available if you hover your mouse over the line with the document and click on .
After selecting “Correct errors and resend”, the document status will change to “Created”. If necessary, you can always view the protocol by clicking on and selecting “ View document flow”.
Why do you need an electronic sick leave certificate?
It is more convenient for an employer to check an electronic sheet than a paper one.
Advantages of electronic sick leave:
- In the Social Insurance Fund system, sick leave cannot be faked. Therefore, the employer will protect itself from deception and will not make unnecessary payments. While paper sick leave is very easy to forge. An electronic document cannot be altered by fraudsters.
- The process of applying for an electronic sick leave is very simple. When drawing up a paper document, it was necessary to use a certain pen and be very careful. In your FSS personal account, you don’t have to be afraid of making a mistake, since a typo is easy to correct.
- Your FSS personal account will always contain information about sick leave. There is no need to create separate folders and store all the papers there.
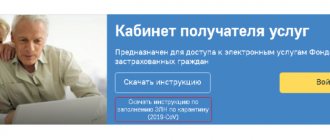
An employee can view sick leave in his personal FSS account independently. There is no need to distract your colleagues.
In order to view the sick leave certificate, you must go through the registration procedure on the official State Services portal. After receiving the password, you can log in to your personal account. You can check your sick leave through your FSS or State Services personal account. Two sites are connected to a single system. The password on the State Services website and the Social Insurance Fund is the same.